


Finally!
The very first reveal of the new house is ready for viewing!
I’m kicking things off with the Baby’s Bathroom/Guest Bath….wanna see? She’s super pretty and clean….for like, the first and last time….

Let’s discuss:
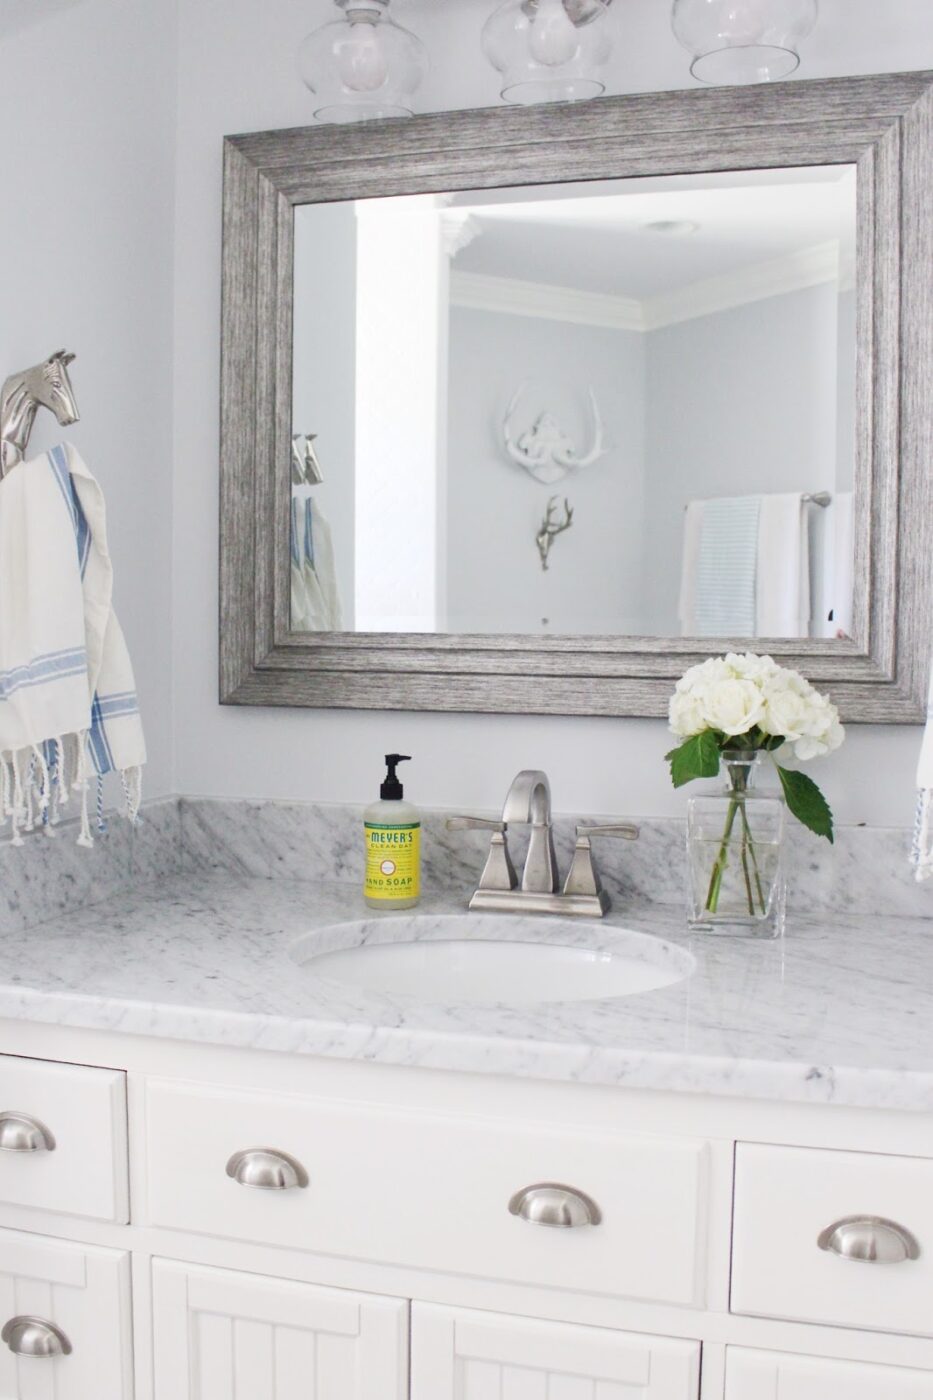
Because it will serve both wild bathing babies and adults whom we are hosting (and thus need a break from the wild baby who bathes), I went for a clean palette of greys, blues and whites with silver accents. Fun masculine details like antlers and a bourbon decanter turned vase mixed with Turkish towels, mix and match white towels and a basket for bath toys rounded things out in the decor department.
I’ll break things down as we go and all sources will be credited it at the end of the post, so hold tight, I got you covered.
First, we’ve gotta start at the beginning with a little Before action:
In order to make a modern bathroom with a reasonable footprint/usable square footage from the existing bath we needed to do a few things to the spaces surrounding the original bathroom.
The first step was to move the water heater from it’s location in the hall.

In the above shot it’s to the left, behind that sweet accordion door (or see the below photo). Once we popped out the water heater, we gained a few feet for the bathroom.
We also ended up re-shaping the hallway. By doing so, we gained a foot or so in our master bedroom, made the hallway smoother and more pleasing to gaze upon and picked up quite a few inches for the hall bath.
Basically, we crushed all of those weird angles and made things cleaner, brighter and bigger.

The shape of the original bath was….unique. Just like the rest of the
house, it was full of weird angles, tight nooks and surprising
style elements (get ready for the tile placement in the shower).
house, it was full of weird angles, tight nooks and surprising
style elements (get ready for the tile placement in the shower).

See the weird wall jutting out on the right side? That was part of the closet in the guest room. We ripped that closet out, moved the bathroom into the guest room a few feet and gave ourselves some room to breathe. Best decision ever.

Please note how tight the entire space is – you could literally sit on the toilet and touch the sink and tub.
Keep an eye on that weird window, it will help you keep your bearings in the After photos!

The space had clearly been updated a bit by the original owners to accommodate aging parents.
Money Saving Tip: we didn’t love the existing vanity unit for this bathroom but we didn’t hate it either. We decide to save it from demo day and moved it into the new powder bath.


We ripped this baby almost completely out and started over – see the weird little window in the shot below?

In this pic you can see the demolished water heater closet space, the completely demoed bathroom and the demoed wall that used to sepatate the bath from the guest room.
Ok, ready to see the After?
I’m kind of nervous!
This is the first reno reveal!
Here she is…..


The toilet is now in the space that was the water heater closet

We ended up with a strange angle thanks to the fireplace brick blocking demo on the other side of that wall so my husband whipped up a set of shelves to add storage and fill the space.


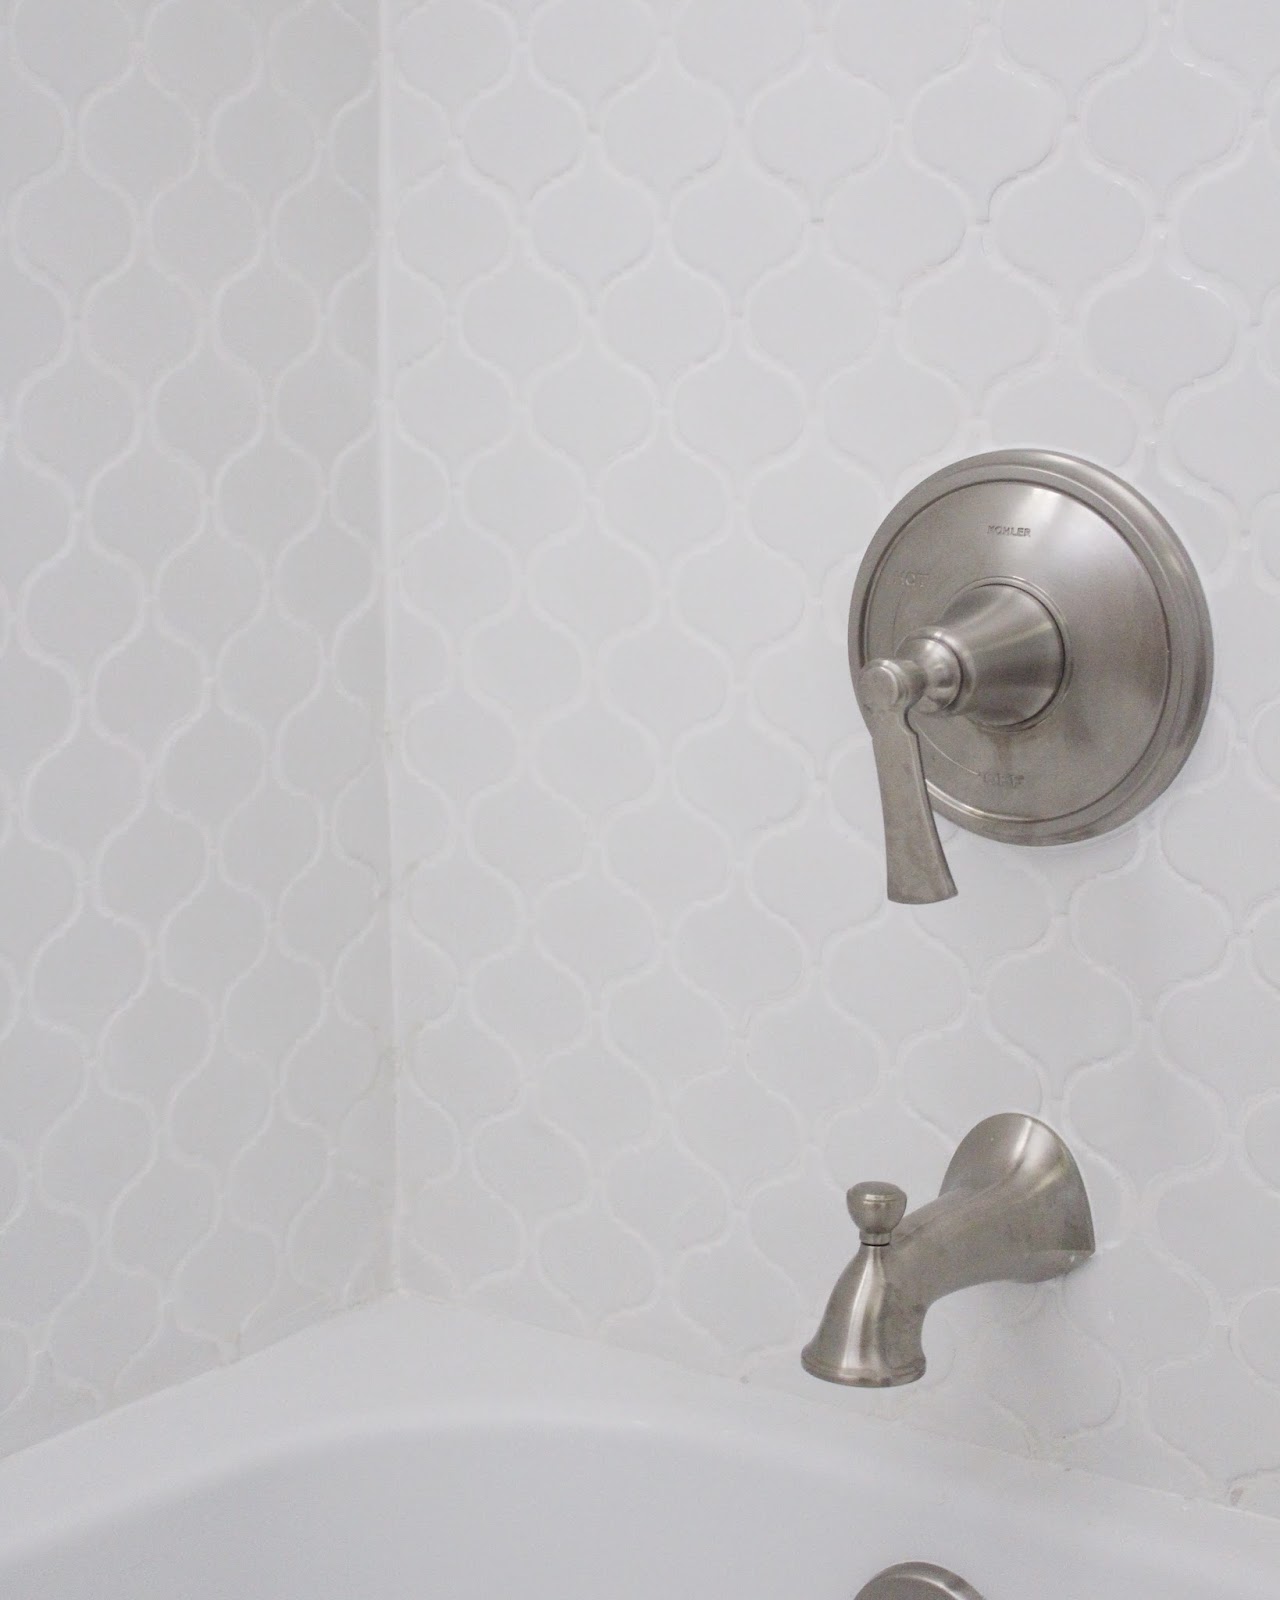
I wanted the tile in both the shower and on the floor to be the statement elements in this space. I found this Moroccan inspired tile at Lowe’s during the Honeymoon Stage of this project and still love it to pieces, even after the fact.
Pro Tip: white grout was key to making this tile clean and sophisticated.

| shower fixtures |

The Moroccan tile edges were finished with cut subway tiles (and so was the window area) so that we could achieve a clean line.

The vanity is in the space
that we stole from the guest room closet – the guest closet is still
very much appropriate in size and the shape of the bathroom is now large
and much more square.
that we stole from the guest room closet – the guest closet is still
very much appropriate in size and the shape of the bathroom is now large
and much more square.

The vanity was purchased from Amazon (after we saw it in person and needed to order a specific size) and my Cararra dreams came true when we had a custom counter top cut for the piece.
The tile flooring is also from Lowe’s and we set it in a brick pattern. It has a fun variety of shade and pattern that I think punches up the white shower tile and Cararra vanity top. Keep an eye out for the same tile in another space, just in a different pattern, in an upcoming reveal. Changing the pattern brought a pop of visual interest (and prevented the design from becoming stale) but keeping the same tile in all of the “wet” spaces brought cohesion to the open floor plan. You know, in my rookie design opinion, and all.


Want to see more of our Renovation? Check out our multipurpose Laundry Room/Mud Room/Office!


Sources:
Wall Color: Benjamin Moore Ice Cubed Silver
Trim Color: Benjamin Moore Chantilly Lace
Toilet: Ferguson
Vanity: Amazon
Faucet: Delta
Mirror: Home Goods similar but much more expensive option
Light Fixture: Purchased from Lowe’s
Clear Glass Globes for fixture: stolen from another fixture, thanks to my lighting partner in crime, Caroline
Shower Tile: Lowe’s
Floor Tile: Lowe’s – I’ve had a ton of questions about this and I can’t find it online to link – the box reads: 3×6 Ancient Gray Subway Ceramic Tile, item #0526261
White Antlers: thrifted for like one dollar and spray painted to High Heaven similar
Bath Fixtures: Kohler, purchased from Lowe’s
Decanter: Pottery Barn
Love love love – those tiles!! X
Beautiful, I love the bright and fresh look! Great job! Found the link to subway tiles. https://www.lowes.com/pd_526261-34692-07EG15_0__?productId=50122023!
I freakin love it! The floors are amazing!!!! Great job!
Wow, this looks gorgeous!! I love the colors you went with, it's so serene and sophisticated! I especially love the tile you chose for the floor, it's stunning! Can't wait to see more 🙂
Wow, I am having major bathroom envy!
This is gorgeous! Love it all! And great photographs, too!
LOVE how this turned out!! It looks awesome lady!!
WOW!! It looks amazing! You have done such a great job picking out all the details and designing and decorating – I can't wait to see more!
xx Em
beauty blether
That shower tile! Heart eye emoji all over that! Antlers, Turkish towels, bourbon decanters….I want to pour myself a glass of wine and just sit in this pretty bathroom!!!
I wanna be a guest in your bathroom. It looks beautiful and bright! Much better than the dark one you replaced. Everything looks perfect.
liz @ sundays with sophie
yep im obsessed! LOVE love the tile you went with for the shower, vanity, faucet and light fixture! way to go mama. wanna come over and renovate our place next?! xo jillian – cornflake dreams
I am currently redoing my master bath and I can only hope it turns out this good!!
NAILED IT. Everything looks incredible! You really did a great job, it's such a dramatic change!
xo,
Esther
https://blog.cuteheads.com
Wow this is amazing! Obsessed with the tile and the antlers!
So can I move into the bathroom?! Seriously the floors are gorgeous and everything you picked out is stunning! xo, Biana –BlovedBoston
Oh this is gorgeous Steph, the Moroccan tiles are beautiful – white grouting all the way for me xx
Gorgeous! No other words.
THIS LOOKS GORGEOUS! Stop it, stop it, stop it. I'm in the middle of reno, sleeping on an air mattress, and eating out of a crock pot. I don't know whether to cry or feel hopeful! IT IS LOVELY!
Gorgeous!!!
I love it! You definitely have an eye for decorating!
I love this, like whoa.
buddy… it is stunning! The photos are gorg and those clear glass globes are to die for. heehee!
Stephanie this is so BEAUTIFUL!! I love everything. I'm trying to pick a favourite part but the whole thing is my favourite part! I love the Moroccan tile, countertop, light fixture, bourbon bottle, antlers, floor, vanity. So yes, everything. Please come redecorate my house, thanks!